Yes, you can make an Arduino Uno into a keyboard. I know what you're thinking, "I thought you needed a ATmega32U4-based Arduino to do that!" Yeah, well, that's just not true. It's just a little harder on an Uno.
Here's a video of my keyboard working:
Here's a video of my keyboard working:
Parts of this guide were adapted from splatspace.org/2015/04/using-an-arduino-as-an-hid/ and https://www.arduino.cc/en/Hacking/DFUProgramming8U2
Parts List:
- Arduino Uno R3 (clones are okay)
- A female to female wire
- A USB cable
Step 1: Coding the Arduino
Here is the code you should upload to your Arduino:
char message[] = "Your Message\n";

// we flag keypresses that need the shift key with hexadecimal 80
#define SHIFT 0x80
const uint8_t _asciimap[128] = // map ascii characters to keypresses
{
  0x00,             // NUL
  0x00,             // SOH
  0x00,             // STX
  0x00,             // ETX
  0x00,             // EOT
  0x00,             // ENQ
  0x00,             // ACK
  0x00,             // BEL
  0x2a,     // BS Backspace
  0x2b,     // TAB  Tab
  0x28,     // LF Enter
  0x00,             // VT
  0x00,             // FF
  0x00,             // CR
  0x00,             // SO
  0x00,             // SI
  0x00,             // DEL
  0x00,             // DC1
  0x00,             // DC2
  0x00,             // DC3
  0x00,             // DC4
  0x00,             // NAK
  0x00,             // SYN
  0x00,             // ETB
  0x00,             // CAN
  0x00,             // EM
  0x00,             // SUB
  0x00,             // ESC
  0x00,             // FS
  0x00,             // GS
  0x00,             // RS
  0x00,             // US

  0x2c,      //  ' '
  0x1e|SHIFT,    // !
  0x34|SHIFT,    // "
  0x20|SHIFT,    // #
  0x21|SHIFT,    // $
  0x22|SHIFT,    // %
  0x24|SHIFT,    // &
  0x34,          // '
  0x26|SHIFT,    // (
  0x27|SHIFT,    // )
  0x25|SHIFT,    // *
  0x2e|SHIFT,    // +
  0x36,          // ,
  0x2d,          // -
  0x37,          // .
  0x38,          // /
  0x27,          // 0
  0x1e,          // 1
  0x1f,          // 2
  0x20,          // 3
  0x21,          // 4
  0x22,          // 5
  0x23,          // 6
  0x24,          // 7
  0x25,          // 8
  0x26,          // 9
  0x33|SHIFT,      // :
  0x33,          // ;
  0x36|SHIFT,      // <
  0x2e,          // =
  0x37|SHIFT,      // >
  0x38|SHIFT,      // ?
  0x1f|SHIFT,      // @
  0x04|SHIFT,      // A
  0x05|SHIFT,      // B
  0x06|SHIFT,      // C
  0x07|SHIFT,      // D
  0x08|SHIFT,      // E
  0x09|SHIFT,      // F
  0x0a|SHIFT,      // G
  0x0b|SHIFT,      // H
  0x0c|SHIFT,      // I
  0x0d|SHIFT,      // J
  0x0e|SHIFT,      // K
  0x0f|SHIFT,      // L
  0x10|SHIFT,      // M
  0x11|SHIFT,      // N
  0x12|SHIFT,      // O
  0x13|SHIFT,      // P
  0x14|SHIFT,      // Q
  0x15|SHIFT,      // R
  0x16|SHIFT,      // S
  0x17|SHIFT,      // T
  0x18|SHIFT,      // U
  0x19|SHIFT,      // V
  0x1a|SHIFT,      // W
  0x1b|SHIFT,      // X
  0x1c|SHIFT,      // Y
  0x1d|SHIFT,      // Z
  0x2f,          // [
  0x31,          // bslash
  0x30,          // ]
  0x23|SHIFT,    // ^
  0x2d|SHIFT,    // _
  0x35,          // `
  0x04,          // a
  0x05,          // b
  0x06,          // c
  0x07,          // d
  0x08,          // e
  0x09,          // f
  0x0a,          // g
  0x0b,          // h
  0x0c,          // i
  0x0d,          // j
  0x0e,          // k
  0x0f,          // l
  0x10,          // m
  0x11,          // n
  0x12,          // o
  0x13,          // p
  0x14,          // q
  0x15,          // r
  0x16,          // s
  0x17,          // t
  0x18,          // u
  0x19,          // v
  0x1a,          // w
  0x1b,          // x
  0x1c,          // y
  0x1d,          // z
  0x2f|SHIFT,    // {
  0x31|SHIFT,    // |
  0x30|SHIFT,    // }
  0x35|SHIFT,    // ~
  0       // DEL
};

uint8_t buf[8] = {
  0,
  0,
  0,
  0,
  0,
  0,
  0,
  0
}; /* Keyboard report buffer */
void setup()
{
  Serial.begin(9600);
} void loop()
{
  delay(1000);
  buf[0] = 0;
  for (char i : message) {
    delay(5);
    if (_asciimap[i] & 0x80) { // is shift needed?
      buf[0] = B10; // If so, make the first digit of buf a shift (2)
      buf[2] = _asciimap[i] & 0x7F; // the third digit of buf is the keypress without shift
    }
    else { // no shift needed
      buf[0] = 0; // First digit of buf is 0, meaning no control or shift keys or whatever
      buf[2] = _asciimap[i]; // map ascii character to keypress for third digit of buf
    }
    Serial.write(buf, 8); // send buf (the keyboard data) over usb
    releaseKey(); // release keys
  }

}

void releaseKey()
{
  buf[0] = 0;
  buf[2] = 0;
  Serial.write(buf, 8); // Release key
}
In the first line of the code, replace "Your Message\n" in the code with the text you want the Arduino to type over and over. Then upload the code to your Arduino.
Once your program is finished uploading, unplug your Arduino.
Once your program is finished uploading, unplug your Arduino.
Step 2: Reprogramming the ATmega16u2
Download the file at: http://www.tinkernut.com/demos/arduino_hid/arduino_hid.zip and then unzip it. The file we just downloaded contains the firmware we will need to send to the ATmega16u2.
Now, let's make the ATmega16u2 a keyboard.
For Windows:
Download Atmel's flip programmer from here.
Install flip.
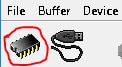
Press the thing that looks like an IC and select ATmega16u2 (picture below).
Now, let's make the ATmega16u2 a keyboard.
For Windows:
Download Atmel's flip programmer from here.
Install flip.
Press the thing that looks like an IC and select ATmega16u2 (picture below).
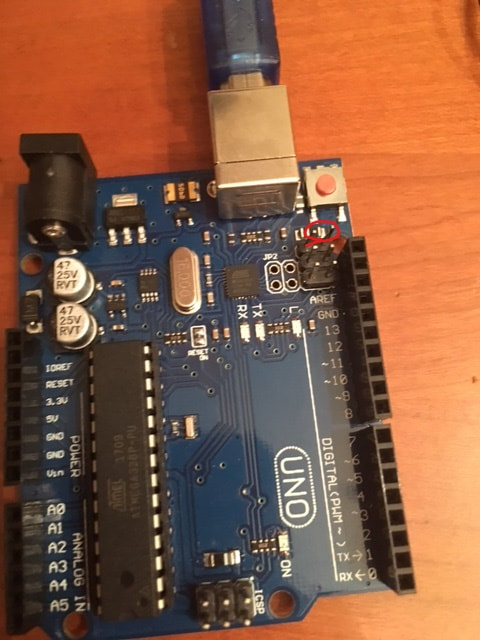
Plug your Arduino into your computer with a female-to-female wire on the 2 ICSP pins closest to the USB port (pins circled in red below).
Once the Arduino boots up, unplug the female-to-female wire.
(you only have to do the below 7 lines once)
Open Device Manager
Look for "unknown device"
right click the entry and select "update driver"
select "search for driver on computer"
navigate to "C:\Program Files (x86)\Atmel\Flip 3.4.7\usb" or wherever you installed flip
confirm the directory
the computer will find the correct driver and install it
(above 7 lines copied from https://github.com/grbl/grbl/issues/995)
Open flip.
Press Ctrl+U.
Press "Open".
Press Ctrl+L.
Remember when we downloaded the zip file before and unzipped it? Go to the unzipped folder and select "Arduino-keyboard-0.3.hex".
Now hit run and wait for flip to finish.
Power cycle the Arduino, and you have a working keyboard!
On Mac or Linux:
Plug your Arduino into your computer with a female-to-female wire on the 2 ICSP pins closest to the USB port (pins circled in red in above image).
Once the Arduino boots up, unplug the female-to-female wire.
From a terminal window, change directories to get into the folder with the firmware. If you saved the zip file in your downloads folder on OSX, then you might type
cd Downloads/arduino_hid/
Once there, type:
sudo dfu-programmer atmega16u2 erase
When this command is done and you get a command prompt again, type
sudo dfu-programmer atmega16u2 flash Arduino-keyboard-0.3.hex
Finally, type
sudo dfu-programmer atmega16u2 reset
(the above block of text was copied from https://www.arduino.cc/en/Hacking/DFUProgramming8U2, but I modified it a little)
Now you have a working keyboard that you made!
P.S. To turn your keyboard back into a regular Arduino, follow the steps below:
For Windows:
Plug your Arduino into your computer with a female-to-female wire on the 2 ICSP pins closest to the USB port (pins circled in red below).
For Windows:
Plug your Arduino into your computer with a female-to-female wire on the 2 ICSP pins closest to the USB port (pins circled in red below).

Open flip.
Press Ctrl+U.
Press "Open".
Press Ctrl+L.
Remember when we downloaded the zip file before and unzipped it? Go to the unzipped folder and select "Arduino-usbserial-uno.hex".
Now hit run and wait for flip to finish.
Then power cycle your Arduino.
Back to normal!
For Mac/Linux:
Plug your Arduino into your computer with a female-to-female wire on the 2 ICSP pins closest to the USB port (pins circled in red in above image).
Once the Arduino boots up, unplug the female-to-female wire.
From a terminal window, change directories to get into the folder with the firmware. If you saved the zip file in your downloads folder on OSX, then you might type
cd Downloads/arduino_hid/
Once there, type:
sudo dfu-programmer atmega16u2 erase
When this command is done and you get a command prompt again, type
sudo dfu-programmer atmega16u2 flash Arduino-usbserial-uno.hex
Finally, type
sudo dfu-programmer atmega16u2 reset
(the above block of text was copied from https://www.arduino.cc/en/Hacking/DFUProgramming8U2, but I modified it a little)
 RSS Feed
