FAA registration needed to fly this drone if you live in the USA. Click here to register.
I've been pretty obsessed with drones lately, and I did a camp last week where we built a drone. But we didn't finish, and I did some of the hardest work and troubleshooting at home. Here's what we did at camp:
Parts I used at camp and at home:
- Assembled the frame
- Soldered the ESCs (electronic speed controllers) to the motors and PDB (power distribution board).
- Connected the flight computer to the receiver and ESCs.
Parts I used at camp and at home:
- 12A SimonK ESCs
- Power distribution board (image at:
- i.pinimg.com/236x/a4/c5/2f/a4c52f59d499272ac63dd1d0bc79d389.jpg)
- Batteries (from here: www.amazon.com/FLOUREON-1500mAh-Battery-m4-fpv250-Shredder/dp/B06Y5VJ13Y/)
- Battery charger (you can get it here)
- 2300KV brushless motors
- Propellers - carbon fiber
- 250mm frame - carbon fiber
- TX and RX package - I used the FS-i6
- Flight computer -- I used the CC3D. Some CC3D's are DOA (mostly clones). I couldn't fix the DOA one I had but you could try to reflash the bootloader or firmware. I tried, and 2 hours later it still didn't work. Luckily I had another one...
Step 1: Assemble the frame
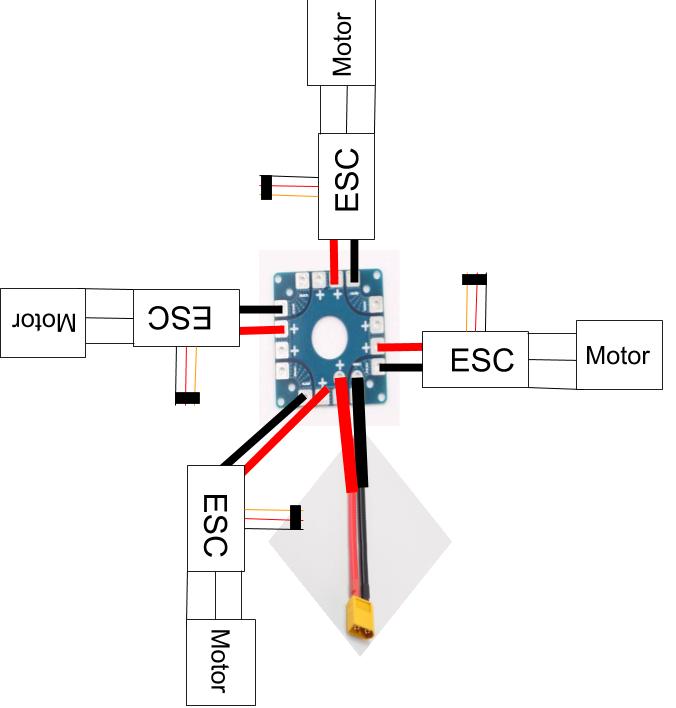
Step 2: Solder the ESCs and battery plug to the power distribution board.
Here's a diagram:
Step 3: Hook up the flight computer
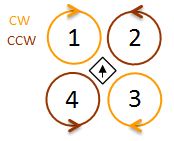
The motors are arranged like this (image from https://static.rcgroups.net/forums/attachments/4/6/9/1/9/3/a6098588-228-Quad-X.jpg)
Remember the orange, red, and brown ESC cables? They might be white, red, and black -- it depends. Plug them into your flight computer with motor 1 in port 1, motor 2 in port 2, etc... Here's an image of the flight computer that shows how to plug them in (source: http://opwiki.readthedocs.io/en/latest/_images/CC_CC3D_Atom_Pinout.png):

Do you have your motors plugged in yet? Once you do, plug in the receiver to the flight computer. Here's how you do that:
1. See the biggest port on the CC3D labeled ReceiverPort on the above diagram? You should have a plug that fits right into it. Image below (from http://cablesandconnectors.com/PIX/ali8p1mm.jpg)
1. See the biggest port on the CC3D labeled ReceiverPort on the above diagram? You should have a plug that fits right into it. Image below (from http://cablesandconnectors.com/PIX/ali8p1mm.jpg)
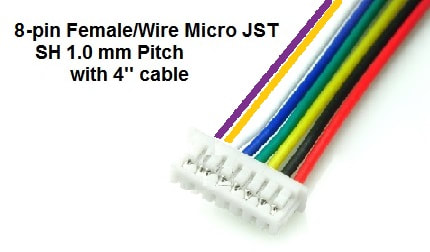
2. Follow the pins down the line. On this connector, it goes: red, black, yellow, green, blue, white, orange, purple.
3. Take the first 3 wires (red, black, yellow) and plug them into channel 1 on the receiver with yellow closest to the center of the receiver.
4. Take the rest of the wires one by one and plug them into the inside pin of every channel. The B/VCC pins should still be open.
When you're done, it should look like mine (note: my cable in the image below has different colors than the image above):

Step 4: "Set up the CC3D!!!!! Yaaaaayyyy!!!!!"...
... this step has caused me mental pain and frustration. Just joking but it did cause me frustration. :)
Okay, so this step is kind of a pain in the butt. But let's do it anyway.
Before proceeding, take off your propellers!!
Why should you take off your propellers? During this step, the CC3D will calibrate (aka spin) the motors and you don't want to get hurt, right? I thought so. So take off your props!
- Download LibrePilot from librepilot.atlassian.net/wiki/spaces/LPDOC/pages/4128780/Downloads and install it.
- Plug in your CC3D to your computer via USB.
- Now open LibrePilot. At the bottom right next to "Connections: " it should say "USB: CopterControl" and the Tx and Rx bars should have green on them.
- Now follow through the Vehicle Setup Wizard, doing what it tells you to do. If any of the motor nuts spin off during motor calibration, it means you need to resolder/switch the outside connections between the motors (only the ones that have the nuts coming off) and the ESCs.
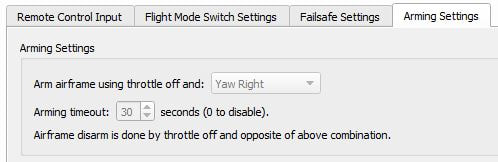
- When you get to the Transmitter Setup Wizard, go through that too. When you finish, I suggest what you do is manually calibrate the throttle by bringing the throttle all the way down and setting that value as the minimum value. Set the neutral value a little higher above the minimum value, because for arming the quadcopter, the throttle needs to be between Low and Neutral. It took me 4 TRIES before it would arm and fly. Here's my settings for an example (my min is 1005, neutral is 1175, and max is 2001 for throttle):

Make sure you check that your arm method isn't "Always Disarmed" (mine is "Yaw Right") otherwise your board won't arm! Once you've checked, hit save (at bottom right) then press "disconnect" and unplug the board:
Now try flying!! To arm (if you choose Yaw Right), put the throttle down and the left stick to the right. Now you're armed, so fly your drone! Watch out, the drone is VERY fast and powerful!
If it doesn't try to spin the motors when you raise the throttle, try arming again. If it still doesn't work, reconnect your CC3D to the computer, then try unchecking the "Wait until the board is steady" checkbox in "Configuration -> Attitude." Then try again.
Feel free to comment if it works (or if you need help)!
 RSS Feed
