Have you ever wanted to make something that can sense you coming without you touching it? If so, keep reading.
List Of Parts
- Arduino UNO (you can get it for $5 here)
- Tin foil
- Cardboard to wrap tin foil around
- Exorbitantly large resistor (I suggest a 10MΩ resistor)
- Alligator clips
- USB cable to program the Arduino
- Laptop
Step 1: Assemble the Circuit
Here's a diagram of the circuit:
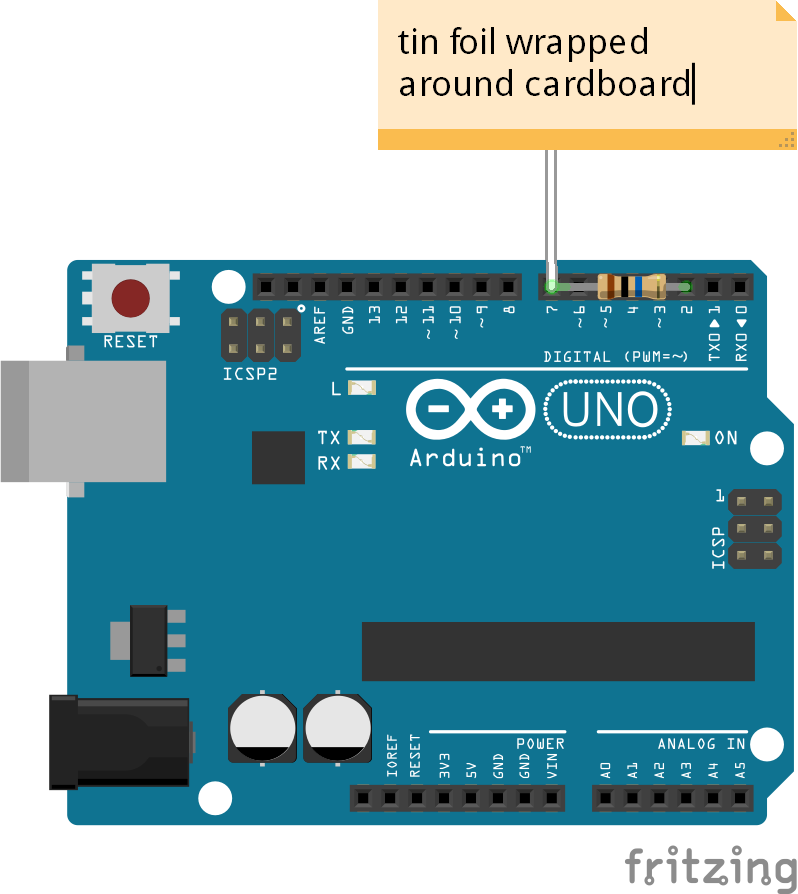
The wire connecting D7 to the tin foil is an alligator clip. Assemble the circuit, and now it's time for the next step!
Step 2: Code
Here's the Arduino code:
/*
 * CapTouch.ino
 * capacitive touch for Arduino
 * Circuit:
 * D2                 D7
 * |                   |______________tin foil
 * |10 megaohm resistor|
 * I learned how to read pins directly from the registers from https://learn.adafruit.com/ir-sensor/using-an-ir-sensor
 * I also created a Processing sketch for this.
 * Copyright (c) 2018 B.G.
 */
float calibration = 0;
int difference = 1;
int diff2;
float average(int num) {
  unsigned long pulses = 0;
  for (int i = 0; i < num; i++) {
    digitalWrite(2, HIGH);
    while (!(PIND & (1 << 7))) {
      // pin is LOW
      pulses++;
    }
    digitalWrite(2, LOW);
    delayMicroseconds(4561);
  }
  return pulses/num;
}
void setup() {
  // put your setup code here, to run once:
  pinMode(2, OUTPUT);
  pinMode(7, INPUT);
  Serial.begin(115200);
  digitalWrite(2, LOW);
  pinMode(13, OUTPUT);
  calibration = average(25);
  Serial.print("Calibration: ");
  Serial.println(calibration);
  diff2 = calibration / 10;
}

void loop() {
  // put your main code here, to run repeatedly:
  unsigned long avg = average(10);
  if (abs(avg - calibration) <= difference) {
    digitalWrite(13, LOW);
    calibration = avg;
  } else {
    digitalWrite(13, HIGH);
  }
  unsigned long mapped = map(avg, calibration - (diff2/2), calibration + diff2, 0, 100);
  if (mapped > 100) {
    Serial.println("TOUCHED");
  } else {
    Serial.println(mapped);
  }
}
I also created a Processing sketch that changes the background of the window (red is you're very close to the sensor, orange is not quite as close, green is further away, and black is your hand is no longer in range) that you can run on your computer. This way, you can visualize the sensor's output. You can download Processing at https://processing.org/
Here's the Processing sketch:
/*
CapTouch.pde
Processing counterpart to Arduino capacitive touch sensor.
Copyright (c) 2018 B.G.
*/
import processing.serial.*;

int lf = 10;    // Linefeed in ASCII
String myString = null;
Serial myPort;  // The serial port

void setup() {
  // List all the available serial ports
  printArray(Serial.list());
  size(500, 500, FX2D);
  // Open the port you are using at the rate you want:
  myPort = new Serial(this, "your serial port", 115200); // REPLACE "your serial port" with the serial port the Arduino is plugged into on your computer!
  myPort.clear();
  // Throw out the first reading, in case we started reading
  // in the middle of a string from the sender.
  myString = myPort.readStringUntil(lf);
  myString = null;
}
float counter = 0;
void draw() {
  while (myPort.available() > 0) {
    myString = myPort.readStringUntil(lf);
    if (myString != null) {
      if (myString.indexOf("TOUCHED") != -1) {
        print("touch");
        background(255, 0, 0);
      } else {
        if (float(myString) < 40) {
          background(0, 0, 0);
        } else if (float(myString) - 58 > 0) {
          background(255, 165, 0);
        } else if (float(myString) - 40 > 0) {
          background(0, 255, 0);
        }
      }
    }
  }
}
And you're done with the project! Have fun using the sensor!
Note: in the Processing sketch, replace "your serial port" with the serial port the Arduino is plugged into. On Windows, the port is in this format: "COM<number between 1 and 256>".
Note: in the Processing sketch, replace "your serial port" with the serial port the Arduino is plugged into. On Windows, the port is in this format: "COM<number between 1 and 256>".
 RSS Feed
